26 June 2011

I Need More... Shoes [Glitter Flip Flop Tutorial]

Another seasonal Nordstrom catalog graced our mailbox recently.  And, as happens EVERY TIME I fall in love with an item and go to order it, whatever it is is OUT OF STOCK!  Grrr...  So I decided to take matters into my own hands this time and re-make these darling little summer shoes.
As luck would have it, Old Navy had their thin-strapped leatherette thongs on clearance for $5.49.  So I grabbed a silver pair and got to work.


SUPPLIES:
Thin-strapped flip flops that have a slightly dressier look than basic rubber ones
Glitter vinyl fabric (this is the same stuff that diners use to cover their barstools)
Hot glue gun & glue
Scissors, rotary cutter and mat
Pen


INSTRUCTIONS:
1. Cut two of each of the following rectangles from the vinyl: 6x1.25-inch (bottom bow), 4x1.25-inch (top bow), and 3.5x0.75-inch (middle band). 


2. On the backsides of the top bow and bottom bow pieces, draw a line to mark the very center of the rectangle.  
3. Pick a rectangle, fold the short edges toward the center mark you've just drawn, meeting in the middle.  Cover with a sheet of tissue paper and zig zag stitch.  The paper will help keep your presser foot from sticking to the vinyl fabric as you sew.  
4. Tear away the tissue paper.  It's okay if a little paper gets left in the stitching.  It will get covered up with the middle band in the end.  Repeat for all of the top bow and bottom bow pieces.  Don't forget to trim your threads.
5. Run a bead of hot glue down the zig zag stitching and stack the top bow piece to the bottom bow piece.  
6. On the middle band pieces, carefully cut a 1-inch slit on one end of the rectangle.  Keep the cut centered on the vinyl fabric.
7. Run a bead of hot glue down both side of the cut and press to the underside of the toe strap.  Watch for glue burns!
8. Hot glue one stacked top/bottom bow to the top of the toe strap.  Be sure to center the bow over the toe strap.
9. Glue the middle band up and over the bow's face and then back around to the bottom, gluing down any loose corners.  Work with a small section at a time or else you'll have a hot gluey mess on your hands.
10.  Slip them on!  You're done and aren't they just cute as a button?  I mean bow?


23 June 2011

I Need More... Curls! [No-heat curls, Part 2]

Wowie, wow!  The No-heat Curls not only worked, but were AMAZING!  Watch the video and then try it yourself.  I'd love to hear your feedback.  Below is mine:
Here is the back of my head, hair wrapped around the headband (or "ramband", as my daughter likes to say).  Just a couple of extra notes from experience:  1) I have short bangs and I left them outside of the headband and 2) I ended up wrapping my head in an old scarf like Aunt Jemima.  My hair is super thick and heavy and it felt as if the weight of it was pulling the headband down and the curl out.  So I panicked and wrapped.  Plus, I think it may have helped keep the frizzies at bay.  (Ha ha!  I foiled your dubious plan, Ernie the nighttime hairdresser!)
This is immediately after I pulled the elastic out of my hair.  Nothing else.  (Why did I wear a black t-shirt for this photo???  Duh.)  Serious curls!
I ran my fingers through the curls maybe two or three times and then sprayed lightly with hairspray.  That's seriously it!  The curls were bouncy and lasted all day.


19 June 2011

I Need More... Soap [Global Soap Project]

I have always been moved by the fight of the underdog, the troubles of the down and out, the spirit of those who have very little.  (Maybe that's why I ended up in the non-profit world professionally, working for those without a voice.)  But since taking on the role of SAHM, my out of the home volunteer opportunities have temporarily slipped away from me.  That doesn't mean that my heart doesn't still ache for those who get by on so little or I don't shout hurrays from the rooftops of those doing great good in the world.


Meet the Global Soap Project: An organization recovering discarded soap from hotels, reprocessing it into new bars and distributing it to vulnerable populations throughout the world.    (HURRAY!) 


Headquartered in Atlanta and incorporated in Georgia, the Global Soap Project was founded by Derreck Kayongo, a humanitarian relief expert whose own family fled Uganda and the tyranny of Idi Amin in 1979. During this tragic and despotic era, close to one million people lost their lives. Many, like Derreck, were displaced in refugee camps. Today, millions of people around the world still live in compromised environments, with limited or no access to clean water and soap.

Recycling soap is a simple concept that provides enormous benefits. The Global Soap Project raises awareness about the lack of sanitation and its consequences in many parts of the world.

With 4.6-million hotel rooms in the United States, an estimated 2.6-million soap bars are discarded every day. By participating in our program, hoteliers are diverting tons of waste from the landfill and bolstering environmental sustainability programs. Hotel managers, housekeepers and guests become more environmentally conscious and more sensitive to the needs of vulnerable populations.


Amazing, just amazing.  Something so simple and as easily forgotten as a shard of used hotel soap can create change and hope for so many.  Get involved today!

05 June 2011

I Need More... Curls! [No-heat Curls]

I stumbled upon this no-heat curl tutorial on another blog, let skeptical thoughts dance through my head, watched the 13 minute video, and now I can't wait to try it myself!  I'll report back on how it went with my hair.  But man, if it works, this girl's going curly this summer!


I Need More... Clearance Finds! [Tank Top to Dress]

I love Target and I love to wander their clearance racks!  Yesterday, I found this girls' tank top for $1.12. Sunshine yellow tank top for a buck?  Yes, please!  I can do something with that (and so can you!).


Tank Top to Dress
(This pattern is based on a size 5T tank top.  Adjust measurements as necessary.)


SUPPLIES
Tank Top
Contrasting fabric for skirt and collar, about 1/2 yard
Interfacing, fusible
Sewing machine (or serger) and thread


HOW TO
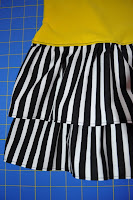
1. Cut two 6.5x21-inch ruffles from fabric.  Cut one 4x15-inch band from fabric.  (Note: The band's width measurement is determined by the measurement of the bottom of the tank top plus an inch for stretch and seam allowance.)


2. Baste first ruffle piece in preparation for gathering.  


With the right sides together, gather and pin the ruffle to the band.  Stitch.  Press seam allowance toward band.  Again with right sides together, match the side seams and stitch.  Flip to right side.


3. Stitch short side seams together on second ruffle piece.  Baste and gently gather one long edge of the ruffle.  Ease and stitch to bottom of tank top, right sides together.


Pin the band with ruffle attached (right side) on top of the ruffle (wrong side) that you just stitched to the tank top.  Stitch.  Press seam allowance up.


4. Topstitch your ruffles to help them behave.


5. Hem ruffles.


6. On to the collar...  Place a piece of scratch paper on top of your tank top.  Sketch a Peter Pan collar.  Cut the sketch out and eyeball it on your tank top.  Love it?  Use it.  Hate it?  Start again.  No biggie.  When you have a shape that you like, pin the sketched collar to fabric, trace the pattern adding about a 1/4-inch seam allowance, and cut four pieces.  I used my handy dandy Mark-B-Gone pen to trace the piece.


Cut two additional pieces out of fusible interfacing and adhere to two collar pieces.


7. With right sides of the collar pieces together, stitch a 1/4-inch seam allowance around outside edge.  Clip seam allowance on curve.  Flip to right side and press.  On the open end, carefully clip the curve and turn under 1/4-inch and iron.  I tucked the very tippy-toppy point under because it was impossible to turn.  (Please don't hate me...  there must be an easier way to do this.  You're so close to being done!)


Pin to the neckline of the tank top and stitch.  (Note: I change the color of my bobbin thread to match the fabric underneath, in this case yellow.  That way, my stitches won't show on the backside of the garment.)


If you're at this point - congratulations! - you made it through the dumbest collar tutorial online.  Everything else was easy though, no?  And now you have a darling little "Tank to Dress" (that YOU made) to show for it!