16 February 2012

I Need More... Clothing [Skinny Jeans for All!]

So, we are just a few months away from welcoming our second little bundle of joy into the family (a boy this time - and unless I can ruffle everything he wears, sewing for him is going to be a BIG metal shift from his big sister's wardrobe...).  With a good five years between the pregnancies, I am finding that - no real surprise here - styles have changed!  [gasp]  "Boysley", as my daughter calls her new little brother, is going to be our last kiddo and I just couldn't bring myself to spend a fortune on maternity clothing that will only see the light of day for a few months.  Time to get creative.  Time to turn bootcut jeans into skinny jeans.  And it couldn't be easier, folks.  I actually did this technique back when I wasn't expecting, too.
 1. Find your bootcut jeans (to be skinny-ified) and a pair of already skinny jeans that you like the fit of.


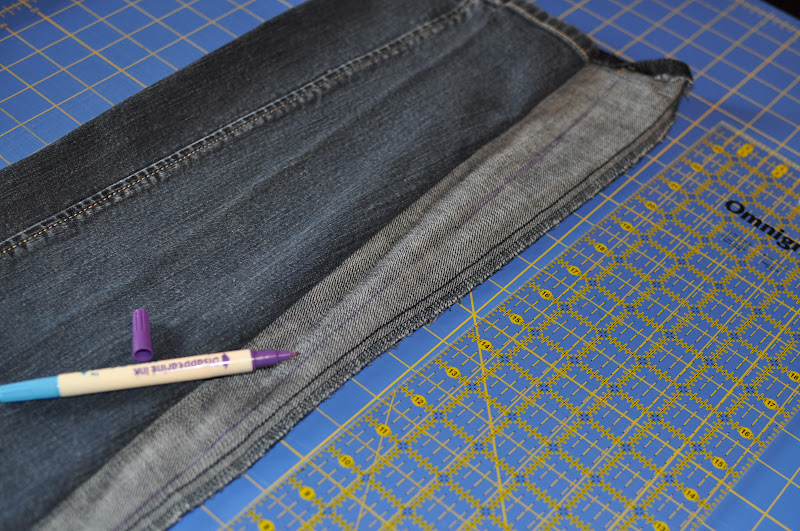
 2. Turn your bootcut jeans inside-out and un-pick the inseam hem and about two inches into the hem on either side of the side seam (giving you a little room to unfold the hem and work more easily).


 3. Lay your existing skinny jeans on top of the now inside-out bootcut jeans and measure the difference in fabric.  Remember, you are working with the INSIDE seam of the pants here.  If you take a look at the seam on the outside of your leg, you'll notice that it is much more complicated, what with topstitching, etc.  Let's stick with the easy-to-hide-any-mistakes area of the inside seam, shall we?


 4. With a Mark-B-Gone or disappearing ink pen, mark your sewing line.  Using my existing skinny jeans as a guide, I add about an inch to an inch and a half to the skinny jeans which should leave plenty of seam allowance.  I would suggest that you try on your bootleg jeans before cutting to see where a natural spot would be to start tapering your pant leg.  For me, I started my tapering about 19 inches up the pant leg.


 5. Serge or sew along your marked sewing line.  Trim your new seam and discard any excess fabric to remove any unnecessary bulk.  These are skinny jeans not bulky, right?


 6. Flip those jeans right-side-out and try them on.  How does the taper look?  Does it look natural or like you're wearing riding pants at the pony show?  This is your chance to adjust.


After you are happy with the new seams, flip back to the inside and, with heavy-duty denim thread, stitch just inside your tapering seam.  This will not only reinforce the seam, but should your seam pull a little - as seams do - from the outside, all you will see is a hint the denim thread that matches all of the other thread on your jeans.  No one will know that you've been doctoring your pants!


 7.  Refold and iron into place the hem.  With heavy duty denim thread, re-sew the length of hem that you unpicked at the start of the project.


8. Flip to the right-side and give the new seams a quick press with the iron (maybe even a spin in the washing machine).  You did it!  Bootcut jeans to skinny in a snap.  Nice work, pal.  Wear them with pride and pray that the trend toward bootcut and flare jeans stays at bay just a little bit longer.

02 January 2012

I Need More... Ice Cream [The Most Memorable Place Mats]

Oh man, I love food.  And some of my best memories are thanks to the special places that serve me great food.  One of those places is in my hometown, Hanford, CA.  It's a little ice cream shop called Superior Dairy, opened in 1929.  
I am proud to say that I was raised on the best ice cream ever made!  Rocky Road (I painted my current dining room in the exact brown of this flavor), Chocolate Chip (the best for milkshakes), and during the summer months (oh yes, I wait for it) Fresh Peach.  
Now that I'm all grown up and living two states away from Superior Dairy, I miss it terribly.  But on my last visit as I gorged myself on Strawberry (sent from heaven, I swear), I took home a few paper menus with a very simple craft in mind.  Place mats!  If I can't live near Superior, I'll at least pretend.  Do you have a favorite eatery like me?  Grab some menus and grab the laminator.  Life's too short not to make meals memorable!


30 November 2011

I Need More... Gadgets [Little Printer by Berg Cloud]

I am SO buying one of these!  Think of all the millions of scraps of paper that will soon confetti my home.  Let the ticker tape parade begin (well, in 2012)...


Watch the video here (and fall in love).


11 November 2011

I Need More... Scarves [No Excuse NOT to Scarf]

This video by wendyslookbook is amazing!  And with winter temperatures starting to drop, it's high time to pull out your box of scarves.  What?!?!  You don't own a million scarves like me?  Well, get busy and buy a few.  They're everywhere, they're practical (thinking warmth here), and they're an inexpensive pop of color and texture!


26 June 2011

I Need More... Shoes [Glitter Flip Flop Tutorial]

Another seasonal Nordstrom catalog graced our mailbox recently.  And, as happens EVERY TIME I fall in love with an item and go to order it, whatever it is is OUT OF STOCK!  Grrr...  So I decided to take matters into my own hands this time and re-make these darling little summer shoes.
As luck would have it, Old Navy had their thin-strapped leatherette thongs on clearance for $5.49.  So I grabbed a silver pair and got to work.


SUPPLIES:
Thin-strapped flip flops that have a slightly dressier look than basic rubber ones
Glitter vinyl fabric (this is the same stuff that diners use to cover their barstools)
Hot glue gun & glue
Scissors, rotary cutter and mat
Pen


INSTRUCTIONS:
1. Cut two of each of the following rectangles from the vinyl: 6x1.25-inch (bottom bow), 4x1.25-inch (top bow), and 3.5x0.75-inch (middle band). 


2. On the backsides of the top bow and bottom bow pieces, draw a line to mark the very center of the rectangle.  
3. Pick a rectangle, fold the short edges toward the center mark you've just drawn, meeting in the middle.  Cover with a sheet of tissue paper and zig zag stitch.  The paper will help keep your presser foot from sticking to the vinyl fabric as you sew.  
4. Tear away the tissue paper.  It's okay if a little paper gets left in the stitching.  It will get covered up with the middle band in the end.  Repeat for all of the top bow and bottom bow pieces.  Don't forget to trim your threads.
5. Run a bead of hot glue down the zig zag stitching and stack the top bow piece to the bottom bow piece.  
6. On the middle band pieces, carefully cut a 1-inch slit on one end of the rectangle.  Keep the cut centered on the vinyl fabric.
7. Run a bead of hot glue down both side of the cut and press to the underside of the toe strap.  Watch for glue burns!
8. Hot glue one stacked top/bottom bow to the top of the toe strap.  Be sure to center the bow over the toe strap.
9. Glue the middle band up and over the bow's face and then back around to the bottom, gluing down any loose corners.  Work with a small section at a time or else you'll have a hot gluey mess on your hands.
10.  Slip them on!  You're done and aren't they just cute as a button?  I mean bow?


23 June 2011

I Need More... Curls! [No-heat curls, Part 2]

Wowie, wow!  The No-heat Curls not only worked, but were AMAZING!  Watch the video and then try it yourself.  I'd love to hear your feedback.  Below is mine:
Here is the back of my head, hair wrapped around the headband (or "ramband", as my daughter likes to say).  Just a couple of extra notes from experience:  1) I have short bangs and I left them outside of the headband and 2) I ended up wrapping my head in an old scarf like Aunt Jemima.  My hair is super thick and heavy and it felt as if the weight of it was pulling the headband down and the curl out.  So I panicked and wrapped.  Plus, I think it may have helped keep the frizzies at bay.  (Ha ha!  I foiled your dubious plan, Ernie the nighttime hairdresser!)
This is immediately after I pulled the elastic out of my hair.  Nothing else.  (Why did I wear a black t-shirt for this photo???  Duh.)  Serious curls!
I ran my fingers through the curls maybe two or three times and then sprayed lightly with hairspray.  That's seriously it!  The curls were bouncy and lasted all day.


19 June 2011

I Need More... Soap [Global Soap Project]

I have always been moved by the fight of the underdog, the troubles of the down and out, the spirit of those who have very little.  (Maybe that's why I ended up in the non-profit world professionally, working for those without a voice.)  But since taking on the role of SAHM, my out of the home volunteer opportunities have temporarily slipped away from me.  That doesn't mean that my heart doesn't still ache for those who get by on so little or I don't shout hurrays from the rooftops of those doing great good in the world.


Meet the Global Soap Project: An organization recovering discarded soap from hotels, reprocessing it into new bars and distributing it to vulnerable populations throughout the world.    (HURRAY!) 


Headquartered in Atlanta and incorporated in Georgia, the Global Soap Project was founded by Derreck Kayongo, a humanitarian relief expert whose own family fled Uganda and the tyranny of Idi Amin in 1979. During this tragic and despotic era, close to one million people lost their lives. Many, like Derreck, were displaced in refugee camps. Today, millions of people around the world still live in compromised environments, with limited or no access to clean water and soap.

Recycling soap is a simple concept that provides enormous benefits. The Global Soap Project raises awareness about the lack of sanitation and its consequences in many parts of the world.

With 4.6-million hotel rooms in the United States, an estimated 2.6-million soap bars are discarded every day. By participating in our program, hoteliers are diverting tons of waste from the landfill and bolstering environmental sustainability programs. Hotel managers, housekeepers and guests become more environmentally conscious and more sensitive to the needs of vulnerable populations.


Amazing, just amazing.  Something so simple and as easily forgotten as a shard of used hotel soap can create change and hope for so many.  Get involved today!