Showing posts with label Fashion. Show all posts

26 August 2013

I Need More... Bow Ties.

I'm a lady who loves bow ties.  Love them on the silent-but-strong mannequins at Nordstrom.  Love them on Handsome Him (AKA my dashing husband).  Love them for the fabrics from which they are made.  LOVE THEM!  So, how is it that Lifetime's Project Runway read my mind and fashioned a recent episode (Season 12, Episode 4: Tie the Knot) around my obsession?  AND featured an amazing organization that promotes equality?  Fabulous!  Way to go Jesse Tyler Ferguson.


The winner deserved to win, no doubt about it.  But his design wasn't my personal favorite.  My favorite came from Dom Streater.  Did you see her dress?  So beautiful and so fresh.


And here is my HELLO!?!?! moment -- Did you know that MoodFabrics.com spotlights all of the creations from current Project Runway seasons AND the fabrics from which they were made on their site?  How many times have you sat on your couch, watching and wishing that you could capture even a tidbit of the essence of a contestant's design?  When I saw Dom's dress, I knew that I had to re-create it for myself!  But where to start?  Now I know!  MoodFabrics.com.  Wow-ee-wow, is this going to be fun!  Click here to see just what I'm jabbering about.  And stay posted to see my version of this fantastic dress!  (But give me a little time, I just had a baby.  I amy be a dreamer, but I'm also a realist.)


10 September 2012

I Need More... than SEVEN folds [Sette Neckwear]

Get out of town.  Seriously, only SEVEN folds?  My sewing/crafty brain cannot get over how these gorgeous, Italian-crafted neckties have ONLY seven folds.  I am in awe and totally salivating.  Which one probably should not do around high-end, silk ties... 


Sette Neckwear pays homage to old world craftsmanship and attention to detail.  (And I'm not just saying that.  If you know me, you know how persnickety I am about fabrics and construction.)  I love the history and tradition of this kind of production:

"A Sette seven-fold necktie is constructed from one beautiful piece of silk asymmetrically folded seven times onto itself.  This process give Sette its name, as "sette" means "seven" in Italian.

"Recently, many high-end neckwear companies have offered a version of a seven-fold necktie.  While these ties may appear elegant on the surface, they lack the traditional craftsmanship and quality of a true seven-fold necktie made the traditional way, as a Sette is made.

"After the Great Depression, the high cost of silk and struggling economy led to cutbacks in quality, and the seven-fold, made in the traditional way, disappeared.  Sette's world-class designer brought this traditional style back to life in the 1980s and has perfected it anew with the Sette seven-fold.

"Is our way more difficult?  yes.  Does it make for a finer product?  Most certainly.

"A Sette is the absolute finest necktie in the world thanks to its exquisite finish and pure silk interior, classically crafted."

And if you act quickly, YOU have a chance to win a Sette necktie!  Like them on Facebook and share their giveaway post, tweet about it, or spread the word on Instagram for a chance to win a political Sette of your choice.  This is a golden opportunity and won't you be sad if you didn't throw your hat in the ring for a chance like this?


Well, if you must know... my favorite Sette (non-election) tie is the delicious Golden Tossed Dots.  Do you have a favorite?


Big love to our friends, the Watkins, for launching an amazing company with fashion flashes from the likes of Mike Allen of Politico, Piers Morgan of CNN, George Stephanopoulos of Good Morning America, and John Dickerson of Face the Nation.  And glossy mentions in Washingtonian Magazine and StyleForum.net.  Not to mention, Sette Neckwear is on The Fancy.  TheFancy.com deserves another post all it's own because I love it so much.  It's like Pinterest in the fast lane.


10 July 2012

I Need More... Singing in the Rain [Tray6]


I love rain.  Alas, living in a desert clime doesn't satisfy my desire to don wellies and splash around in puddles as often as I would like.  But it doesn't mean that a girl shouldn't be prepared for when the thunder rolls!  Speaking of... have you seen the new umbrellas by Tray6?  These are not the umbrellas of yesteryear, that were "plain black and boring plaid... with shoddy spokes and sharp metal parts".  Oh no!  These are beautifully designed and an accessory that you want to have at the ready.  
(I think I might want need the Pixel Plaid Orange Stick Umbrella and Rain-Resistant Raspberry Crossbody Bag, if you're wondering.)


Check out Tray6's web site and like them on Facebook.  I am so proud of my old school buddy, Peggy Hsu, on the launch of her fabulous new company!  J'espere que il pleut!  (We took French together...)


21 June 2012

I Need More... Cute Kid Clothing [dolman sleeve shirt]

Why is it that little girl clothing in stores for four to five year olds is still designed as if they are either: 1) still 2 years old, splattered with unnecessary glittered butterflies (I so hate butterflies) or 2) way overpriced for just how quickly little kids grow of their clothing (Crewcuts... I'm looking at you)?


Why is it that I hoard ideas for fashionable childrens' clothing, am a fairly experienced seamstress, and yet my daughter's wardrobe still comes from the store?


Okay.  Thanks for playing therapist for a moment.  Now back to the creation at hand.  Let's start with just about the easiest piece of clothing to sew.  Ever.  Kindergarden - meet the dolman sleeve tshirt - because my daughter will be wearing one of these babies every day.


SUPPLIES
A basic tshirt that your kid wears now as a rough pattern
Jersey knit fabric (unwanted adult tshirts work beautifully for this)
Sewing machine, thread, scissors, etc.


DIRECTIONS


1. Lay your child's tshirt on top of your new shirt's fabric as a guide.  Cut around the existing shirt, allowing some breathing room.  A dolman shirt should be a bit roomy.  HINT: To get a perfectly symmetrical shirt, cut half of the shirt and then fold your fabric in half to cut the remaining half.  Wildly helpful!


Cut out an accompanying waistband, 4-inches wide and a few inches shy of the bottom of your shirt's measurement.  This will rely mostly on how stretchy your fabric is.


2. Serge (or zigzag) the necklines and sleeve openings, fold under about 1/4-inch, and hem.  Be gentle here, you're working with knit.  Too much tug and you have a ripply mess; too little and every time Janie puts on this shirt your likely to have a seam pop.


3. With right sides together, serge the shoulder and side seams.


4. Sew waistband fabric into a tube and then fold in half.  Turn your shirt right side out and pin waistband piece to main shirt.  Serge.


5. Pat yourself on the back.  You are so done!


16 February 2012

I Need More... Clothing [Skinny Jeans for All!]

So, we are just a few months away from welcoming our second little bundle of joy into the family (a boy this time - and unless I can ruffle everything he wears, sewing for him is going to be a BIG metal shift from his big sister's wardrobe...).  With a good five years between the pregnancies, I am finding that - no real surprise here - styles have changed!  [gasp]  "Boysley", as my daughter calls her new little brother, is going to be our last kiddo and I just couldn't bring myself to spend a fortune on maternity clothing that will only see the light of day for a few months.  Time to get creative.  Time to turn bootcut jeans into skinny jeans.  And it couldn't be easier, folks.  I actually did this technique back when I wasn't expecting, too.
 1. Find your bootcut jeans (to be skinny-ified) and a pair of already skinny jeans that you like the fit of.


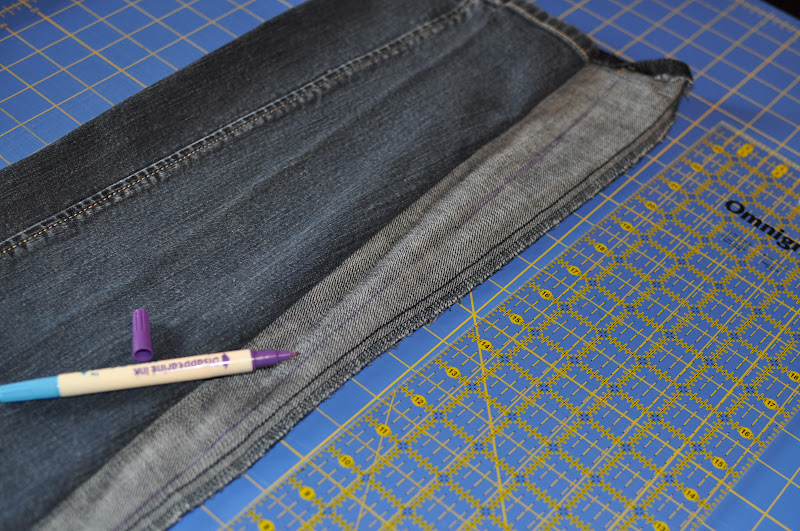
 2. Turn your bootcut jeans inside-out and un-pick the inseam hem and about two inches into the hem on either side of the side seam (giving you a little room to unfold the hem and work more easily).


 3. Lay your existing skinny jeans on top of the now inside-out bootcut jeans and measure the difference in fabric.  Remember, you are working with the INSIDE seam of the pants here.  If you take a look at the seam on the outside of your leg, you'll notice that it is much more complicated, what with topstitching, etc.  Let's stick with the easy-to-hide-any-mistakes area of the inside seam, shall we?


 4. With a Mark-B-Gone or disappearing ink pen, mark your sewing line.  Using my existing skinny jeans as a guide, I add about an inch to an inch and a half to the skinny jeans which should leave plenty of seam allowance.  I would suggest that you try on your bootleg jeans before cutting to see where a natural spot would be to start tapering your pant leg.  For me, I started my tapering about 19 inches up the pant leg.


 5. Serge or sew along your marked sewing line.  Trim your new seam and discard any excess fabric to remove any unnecessary bulk.  These are skinny jeans not bulky, right?


 6. Flip those jeans right-side-out and try them on.  How does the taper look?  Does it look natural or like you're wearing riding pants at the pony show?  This is your chance to adjust.


After you are happy with the new seams, flip back to the inside and, with heavy-duty denim thread, stitch just inside your tapering seam.  This will not only reinforce the seam, but should your seam pull a little - as seams do - from the outside, all you will see is a hint the denim thread that matches all of the other thread on your jeans.  No one will know that you've been doctoring your pants!


 7.  Refold and iron into place the hem.  With heavy duty denim thread, re-sew the length of hem that you unpicked at the start of the project.


8. Flip to the right-side and give the new seams a quick press with the iron (maybe even a spin in the washing machine).  You did it!  Bootcut jeans to skinny in a snap.  Nice work, pal.  Wear them with pride and pray that the trend toward bootcut and flare jeans stays at bay just a little bit longer.

11 November 2011

I Need More... Scarves [No Excuse NOT to Scarf]

This video by wendyslookbook is amazing!  And with winter temperatures starting to drop, it's high time to pull out your box of scarves.  What?!?!  You don't own a million scarves like me?  Well, get busy and buy a few.  They're everywhere, they're practical (thinking warmth here), and they're an inexpensive pop of color and texture!


23 June 2011

I Need More... Curls! [No-heat curls, Part 2]

Wowie, wow!  The No-heat Curls not only worked, but were AMAZING!  Watch the video and then try it yourself.  I'd love to hear your feedback.  Below is mine:
Here is the back of my head, hair wrapped around the headband (or "ramband", as my daughter likes to say).  Just a couple of extra notes from experience:  1) I have short bangs and I left them outside of the headband and 2) I ended up wrapping my head in an old scarf like Aunt Jemima.  My hair is super thick and heavy and it felt as if the weight of it was pulling the headband down and the curl out.  So I panicked and wrapped.  Plus, I think it may have helped keep the frizzies at bay.  (Ha ha!  I foiled your dubious plan, Ernie the nighttime hairdresser!)
This is immediately after I pulled the elastic out of my hair.  Nothing else.  (Why did I wear a black t-shirt for this photo???  Duh.)  Serious curls!
I ran my fingers through the curls maybe two or three times and then sprayed lightly with hairspray.  That's seriously it!  The curls were bouncy and lasted all day.


05 June 2011

I Need More... Curls! [No-heat Curls]

I stumbled upon this no-heat curl tutorial on another blog, let skeptical thoughts dance through my head, watched the 13 minute video, and now I can't wait to try it myself!  I'll report back on how it went with my hair.  But man, if it works, this girl's going curly this summer!