

05 June 2011
I Need More... Curls! [No-heat Curls]
I stumbled upon this no-heat curl tutorial on another blog, let skeptical thoughts dance through my head, watched the 13 minute video, and now I can't wait to try it myself! I'll report back on how it went with my hair. But man, if it works, this girl's going curly this summer!


I Need More... Clearance Finds! [Tank Top to Dress]
I love Target and I love to wander their clearance racks! Yesterday, I found this girls' tank top for $1.12. Sunshine yellow tank top for a buck? Yes, please! I can do something with that (and so can you!).

Tank Top to Dress
(This pattern is based on a size 5T tank top. Adjust measurements as necessary.)
SUPPLIES
Tank Top
Contrasting fabric for skirt and collar, about 1/2 yard
Interfacing, fusible
Sewing machine (or serger) and thread
HOW TO
1. Cut two 6.5x21-inch ruffles from fabric. Cut one 4x15-inch band from fabric. (Note: The band's width measurement is determined by the measurement of the bottom of the tank top plus an inch for stretch and seam allowance.)

2. Baste first ruffle piece in preparation for gathering.

With the right sides together, gather and pin the ruffle to the band. Stitch. Press seam allowance toward band. Again with right sides together, match the side seams and stitch. Flip to right side.

3. Stitch short side seams together on second ruffle piece. Baste and gently gather one long edge of the ruffle. Ease and stitch to bottom of tank top, right sides together.

Pin the band with ruffle attached (right side) on top of the ruffle (wrong side) that you just stitched to the tank top. Stitch. Press seam allowance up.

4. Topstitch your ruffles to help them behave.
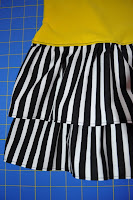
5. Hem ruffles.
6. On to the collar... Place a piece of scratch paper on top of your tank top. Sketch a Peter Pan collar. Cut the sketch out and eyeball it on your tank top. Love it? Use it. Hate it? Start again. No biggie. When you have a shape that you like, pin the sketched collar to fabric, trace the pattern adding about a 1/4-inch seam allowance, and cut four pieces. I used my handy dandy Mark-B-Gone pen to trace the piece.


Cut two additional pieces out of fusible interfacing and adhere to two collar pieces.

7. With right sides of the collar pieces together, stitch a 1/4-inch seam allowance around outside edge. Clip seam allowance on curve. Flip to right side and press. On the open end, carefully clip the curve and turn under 1/4-inch and iron. I tucked the very tippy-toppy point under because it was impossible to turn. (Please don't hate me... there must be an easier way to do this. You're so close to being done!)


Pin to the neckline of the tank top and stitch. (Note: I change the color of my bobbin thread to match the fabric underneath, in this case yellow. That way, my stitches won't show on the backside of the garment.)

If you're at this point - congratulations! - you made it through the dumbest collar tutorial online. Everything else was easy though, no? And now you have a darling little "Tank to Dress" (that YOU made) to show for it!


Tank Top to Dress
(This pattern is based on a size 5T tank top. Adjust measurements as necessary.)
SUPPLIES
Tank Top
Contrasting fabric for skirt and collar, about 1/2 yard
Interfacing, fusible
Sewing machine (or serger) and thread
HOW TO
1. Cut two 6.5x21-inch ruffles from fabric. Cut one 4x15-inch band from fabric. (Note: The band's width measurement is determined by the measurement of the bottom of the tank top plus an inch for stretch and seam allowance.)

2. Baste first ruffle piece in preparation for gathering.

With the right sides together, gather and pin the ruffle to the band. Stitch. Press seam allowance toward band. Again with right sides together, match the side seams and stitch. Flip to right side.

3. Stitch short side seams together on second ruffle piece. Baste and gently gather one long edge of the ruffle. Ease and stitch to bottom of tank top, right sides together.

Pin the band with ruffle attached (right side) on top of the ruffle (wrong side) that you just stitched to the tank top. Stitch. Press seam allowance up.

4. Topstitch your ruffles to help them behave.

5. Hem ruffles.
6. On to the collar... Place a piece of scratch paper on top of your tank top. Sketch a Peter Pan collar. Cut the sketch out and eyeball it on your tank top. Love it? Use it. Hate it? Start again. No biggie. When you have a shape that you like, pin the sketched collar to fabric, trace the pattern adding about a 1/4-inch seam allowance, and cut four pieces. I used my handy dandy Mark-B-Gone pen to trace the piece.


Cut two additional pieces out of fusible interfacing and adhere to two collar pieces.
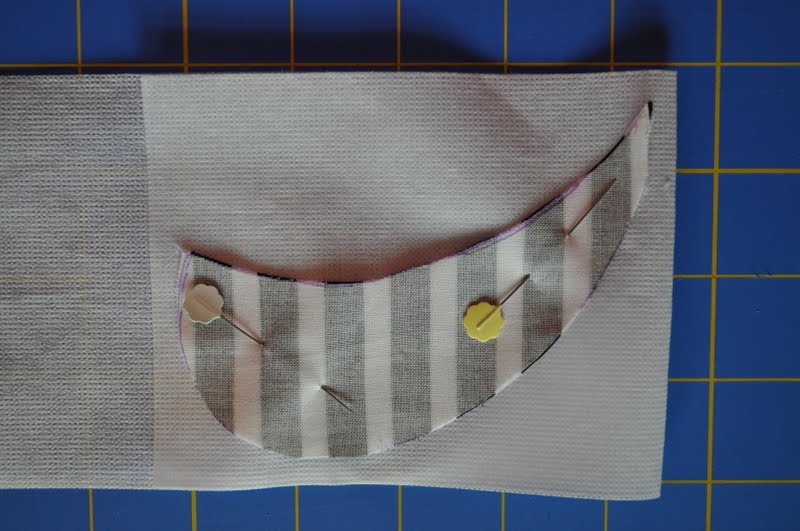
7. With right sides of the collar pieces together, stitch a 1/4-inch seam allowance around outside edge. Clip seam allowance on curve. Flip to right side and press. On the open end, carefully clip the curve and turn under 1/4-inch and iron. I tucked the very tippy-toppy point under because it was impossible to turn. (Please don't hate me... there must be an easier way to do this. You're so close to being done!)
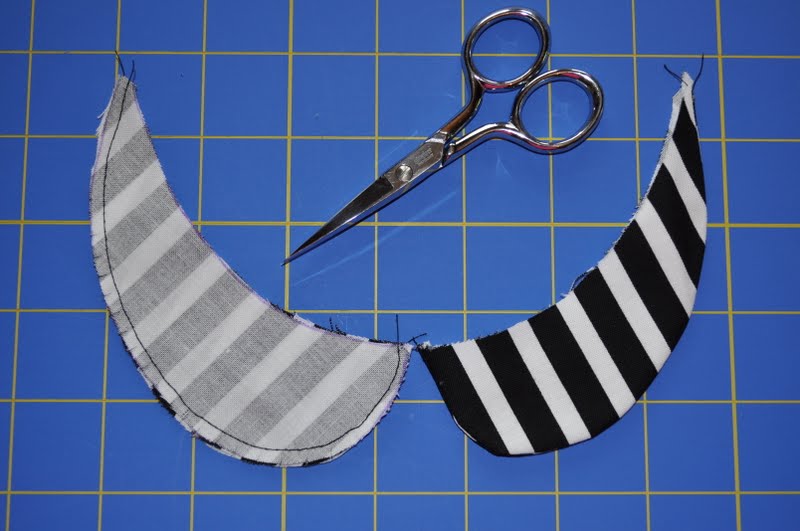
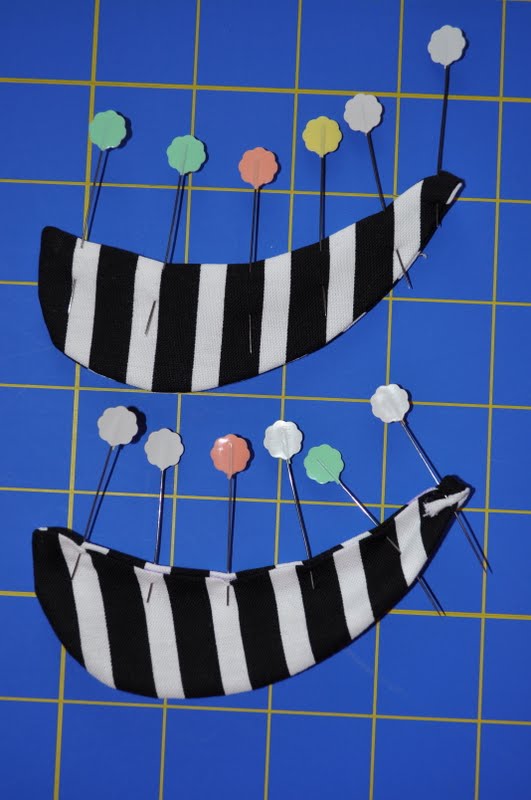
Pin to the neckline of the tank top and stitch. (Note: I change the color of my bobbin thread to match the fabric underneath, in this case yellow. That way, my stitches won't show on the backside of the garment.)

If you're at this point - congratulations! - you made it through the dumbest collar tutorial online. Everything else was easy though, no? And now you have a darling little "Tank to Dress" (that YOU made) to show for it!

26 May 2011
I Need More... Mail [Signed, sealed, delivered. I'm yours!]
My almost four year old daughter loves to run and check the mailbox. She also loves to write (okay, draw) little notes for everyone. The two loves come together with this super easy felt mail carrier set. Dust off the sewing machine and scavenge for bits of left over felt and you're on your way!

Supplies:
Felt (red, white, blue)
Thread (white, black)
Paper printout of the USPS eagle logo
Blue ribbon or nylon webbing, 30-inches or so
Optional gift idea: tuck a notebook, stickers, and a couple of pencils in the bag
How To - Mail Bag:
1. Out of blue felt, cut the following: one 11x12-inch rectangle, one 9x12 inch rectangle, and one 5x12 inch rectangle.

2. Scale the postal logo eagle, tip to tail, to about 8x5 inches and print. Pin the logo to a scrap of white felt and cut out just like a paper pattern. Lay the eagle one inch from the bottom edge of the 9x12 blue rectangle, pin in place, and stitch with white thread. Remember, this is felt and felt's pretty forgiving at hiding stitches. So you don't have to be super exact. But do give yourself at least 1/8-1/4 inch seam allowance throughout the whole project. And don't forget to backstitch! (I sound like my mother...)


3. With wrong sides together, stitch the sides and bottom of the blue 9x12 and 11x12 inch pieces together. Lay the blue 5x12 inch piece on the un-sewn edge of the 11x12 blue piece and stitch. Starting to see the bag? Good.

4. Securely stitch the length of ribbon or webbing to the back top corners of the bag forming the strap.
How To - Letter:
1. Out of the white felt, cut the following per envelope: one 5x8 inch rectangle, one 4x8 inch rectangle, and one 3.5x8 inch rectangle. Out of red felt, cut the following per envelope: one 1/5x1/5 inch square.

2. Cut a point in the 4x8 inch rectangle to form the flap of the envelope. Really, you can eyeball this. But I measured 1.5 inches down from the side edges and then cut in to the center from both sides.
3. On the 5x8 inch white rectangle, place the stamp about 1/4 inch from the corner of the envelope. Stitch in place with red top thread and white bobbin thread. This hides the mess of thread on the inside of the envelope. Swap your top thread to black and set your machine to zigzag. Zig zag the address and return address. No need to be precise there; it's just an abstract interpretation of the text anyway. Hint: I stitched all the lines of the address without stopping to cut my thread in between. I just lifted the presser foot and turned my fabric then dropped it again, trimming all the threads at the end. It just seemed like way too much work to keep clipping. It may ravel a bit, but I'm totally okay with that.

4. With wrong sides together, stitch the sides and bottom of the white, now stamped, 5x8 inch and the white 4x8 inch pieces. Lay the trimmed, white 3.5x8 inch envelope flap on the un-sewn edge of the x8 piece and stitch. Have you got an envelope? Fantastic!

I love finding these envelopes on my pillow with little love notes inside. I happen to think that they were delivered by the cutest mail carrier ever.

Supplies:
Felt (red, white, blue)
Thread (white, black)
Paper printout of the USPS eagle logo
Blue ribbon or nylon webbing, 30-inches or so
Optional gift idea: tuck a notebook, stickers, and a couple of pencils in the bag
How To - Mail Bag:
1. Out of blue felt, cut the following: one 11x12-inch rectangle, one 9x12 inch rectangle, and one 5x12 inch rectangle.

2. Scale the postal logo eagle, tip to tail, to about 8x5 inches and print. Pin the logo to a scrap of white felt and cut out just like a paper pattern. Lay the eagle one inch from the bottom edge of the 9x12 blue rectangle, pin in place, and stitch with white thread. Remember, this is felt and felt's pretty forgiving at hiding stitches. So you don't have to be super exact. But do give yourself at least 1/8-1/4 inch seam allowance throughout the whole project. And don't forget to backstitch! (I sound like my mother...)


3. With wrong sides together, stitch the sides and bottom of the blue 9x12 and 11x12 inch pieces together. Lay the blue 5x12 inch piece on the un-sewn edge of the 11x12 blue piece and stitch. Starting to see the bag? Good.

4. Securely stitch the length of ribbon or webbing to the back top corners of the bag forming the strap.
How To - Letter:
1. Out of the white felt, cut the following per envelope: one 5x8 inch rectangle, one 4x8 inch rectangle, and one 3.5x8 inch rectangle. Out of red felt, cut the following per envelope: one 1/5x1/5 inch square.

2. Cut a point in the 4x8 inch rectangle to form the flap of the envelope. Really, you can eyeball this. But I measured 1.5 inches down from the side edges and then cut in to the center from both sides.
3. On the 5x8 inch white rectangle, place the stamp about 1/4 inch from the corner of the envelope. Stitch in place with red top thread and white bobbin thread. This hides the mess of thread on the inside of the envelope. Swap your top thread to black and set your machine to zigzag. Zig zag the address and return address. No need to be precise there; it's just an abstract interpretation of the text anyway. Hint: I stitched all the lines of the address without stopping to cut my thread in between. I just lifted the presser foot and turned my fabric then dropped it again, trimming all the threads at the end. It just seemed like way too much work to keep clipping. It may ravel a bit, but I'm totally okay with that.

4. With wrong sides together, stitch the sides and bottom of the white, now stamped, 5x8 inch and the white 4x8 inch pieces. Lay the trimmed, white 3.5x8 inch envelope flap on the un-sewn edge of the x8 piece and stitch. Have you got an envelope? Fantastic!

I love finding these envelopes on my pillow with little love notes inside. I happen to think that they were delivered by the cutest mail carrier ever.
I Need More... Shoes [Winner! Twigg Shoes]
Get out! I WON!!! I happen to think it may have been my glittery destiny to have these little gold beauties on my feet, but you make that judgement for yourself. (Get it? I Need More Glitter = Glittery ballet flat giveaway) Whatever you may think, I am SO excited! Want a piece of the excitement, too? Swing over to Twigg Shoes quick-like, they're $5 off today. So stop reading this jibber jabber. GO!


Oh man, Twigg. I love you! :)
23 May 2011
I Need More... Giveaways! [Twigg Shoes]

About a year ago, my southern California girlfriend introduced me to some fantastic shoes called Twigg. They are super cute and super affordable! (And, with styles changing faster than most can keep up, these shoes are perfect for the budget-conscious.) If you happen to be in SoCal, you're in luck because the company comes to your home Tupperware party-style and sells shoes in addition to their online sales. What could be more fun?

So, take a look at their cute styles and then quickly hop over to their blog for more information on a giveaway of their latest style - Glittery Gold ballet flats. (You NEED these...)

28 April 2011
I Need More... Words [Little Princes]

I recently devoured a book called Little Princes: One Man's Promise to Bring Home the Lost Children of Nepal by Conor Grennan. Within its pages is an account of one man's journey to find himself by taking a brief hiatus from a career to "self-indulgently" travel the world. What he discovered on this journey could not have been farther from the experience he had originally planned. Grennan fell deeply in love with the orphaned children of Nepal and was moved by their seemingly hopeless situation - lost, poverty-stricken, voiceless and afraid. He and a very small handful of friends began fighting the tide of child trafficking, a dangerous prospect in this remote part of the world. His story is remarkable and his work continues to this day.
Dust off your library card if you must, but buying this book is better! A portion of all book sales support Next Generation Nepal, the non-profit organization that Conor Grennan established to reconnect trafficked children with their families in Nepal.
REVIEW PROS: It will tug at your heartstrings and, hopefully, move you to action.
REVIEW CONS: It may not be the most eloquent piece of literature ever published, but the story is compelling. You will weep.
RATING: 4/5
19 April 2011
I Need More... Picnics [Have you seen this??? Tiffin Box]


REVIEW PROS: It's the perfect size for a generous lunch. It saves the earth from another jumble of plastic sandwich bags. It's top-rack dishwasher safe. It makes the user look hip.
REVIEW CONS: The compartments do not have an airtight seal. I know full well that my daughter will eventually find a way to pack her treasures into it and persuade me (with puppy dog eyes) to keep it.
Subscribe to:
Posts (Atom)

